Styles Tutorial
Please forgive me for missing last “Funday”. Between having a bad health week and both my PC and MAC giving me problems, I did not get much done. Maybe my computers had the same virus as me! Anyways, it is good to be back.
I received this tutorial from Digital Scrapbooking Studio’s newsletter, and I want to share it with you. This will come in handy if you like to use styles. There is a free template to go with this tutorial that you can get by clicking on “SnickerdoodleDesigns” below and then scrolling to the end of the page, and there is a nice tip at the end of this tutorial also.
Creating your own Style Strip for Photoshop Layer Styles
by SnickerdoodleDesigns on 5 July 2014 in Designer Tools & Tips, Elements (PSE),Photoshop CS+, Tutorials
1. Here is a template that I created for my Style Strips. There are 6 squares, and each square is on it’s own layer. You can make your own template with as many or as few squares as you like, or you may download my template for your use at the bottom of this post.

2. Load or install the Photoshop Style that you wish to create a Strip for.
3. Go back to the template and replace the name of each layer (in my preview named “Product Name”) with the name of the Style you wish to create the Style Strip for.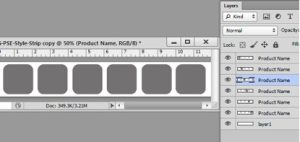
4. With the first layer in the template selected, click on the first Style that is in the Style set you are using. In the image below, you will see that I am creating a Style Strip for my Leather Styles-Set 1, so I have changed the names of my layers to reflect that information. I have also applied the first Style in this Style Set to the first square.
5. To complete the Strip, I would just need to click on the next layer (SD_LeatherSet1-2) to make it active, then click on the Leather-Set1-2 Style in the Styles Panel to apply it to the 2nd rectangle (that is on the 2nd layer); then click on Layer 3, and so on.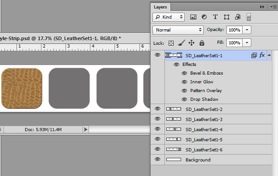
6. Once the Strip has been completed, save as a PSD or TIFF, and file it in your choice of places. I like to keep my Style Strips together with everything else that goes with that product (.asl file, tutorials, and such).
 Note: If you are creating a Strip that has more than 6 Styles in it: Create a new document (size dependent upon how much space you need); drag the original template onto the new document; duplicate the number of layers (squares) that you need; create your Style Strip; crop the transparent pixels on your new document; and save as noted above.
TIP: Using Style Strips is helpful when you don’t want to load or install Styles. Just open the PSD (or TIFF, depending upon how the Strip is saved), right click on layer of the Style you want to use and choose the “Copy Layer Style” option. Right click on the layer you wish to apply the Style to and choose “Apply Layer Style.” Using Style Strips is especially helpful for those who have Photoshop Elements versions that do not allow “loading” of Styles.
admin
I am a DSAHM of a beautiful daughter and 3 furry babies. I have an amazing husband whom I love to cook for as well as work on our home together. I also have an older daughter who will be headed to college soon. I am truly blessed with what I have been given and just do my best to give back!
You May Also Like

The last train of the year… Snowbells Ring.. has left the station!!
New Release: Ancestry Templates!